Learning Live Templates for Jetpack Compose

M
Android GDE
Search for a command to run...
Those were really great tips..!! Since jetpack Compose is all about writing functions live templates really gonna help in speeding up...! By the way, your blog was quite awesome and engaging. I am really new to blogging and also writing on Jetpack Compose so not many people are there who can review It. So, It would be really helpful if you can read my blog and give me your feedback. Thanks.
This series is all about the Live Template capabilities in Android Studio. It covers: - An introduction to Live Templates - How to create custom Live Templates - How to setup sharing Live Templates
A Frictionless Approach to Self-Advocacy for Engineers and Managers

A best practice to prevent feature flag drift.

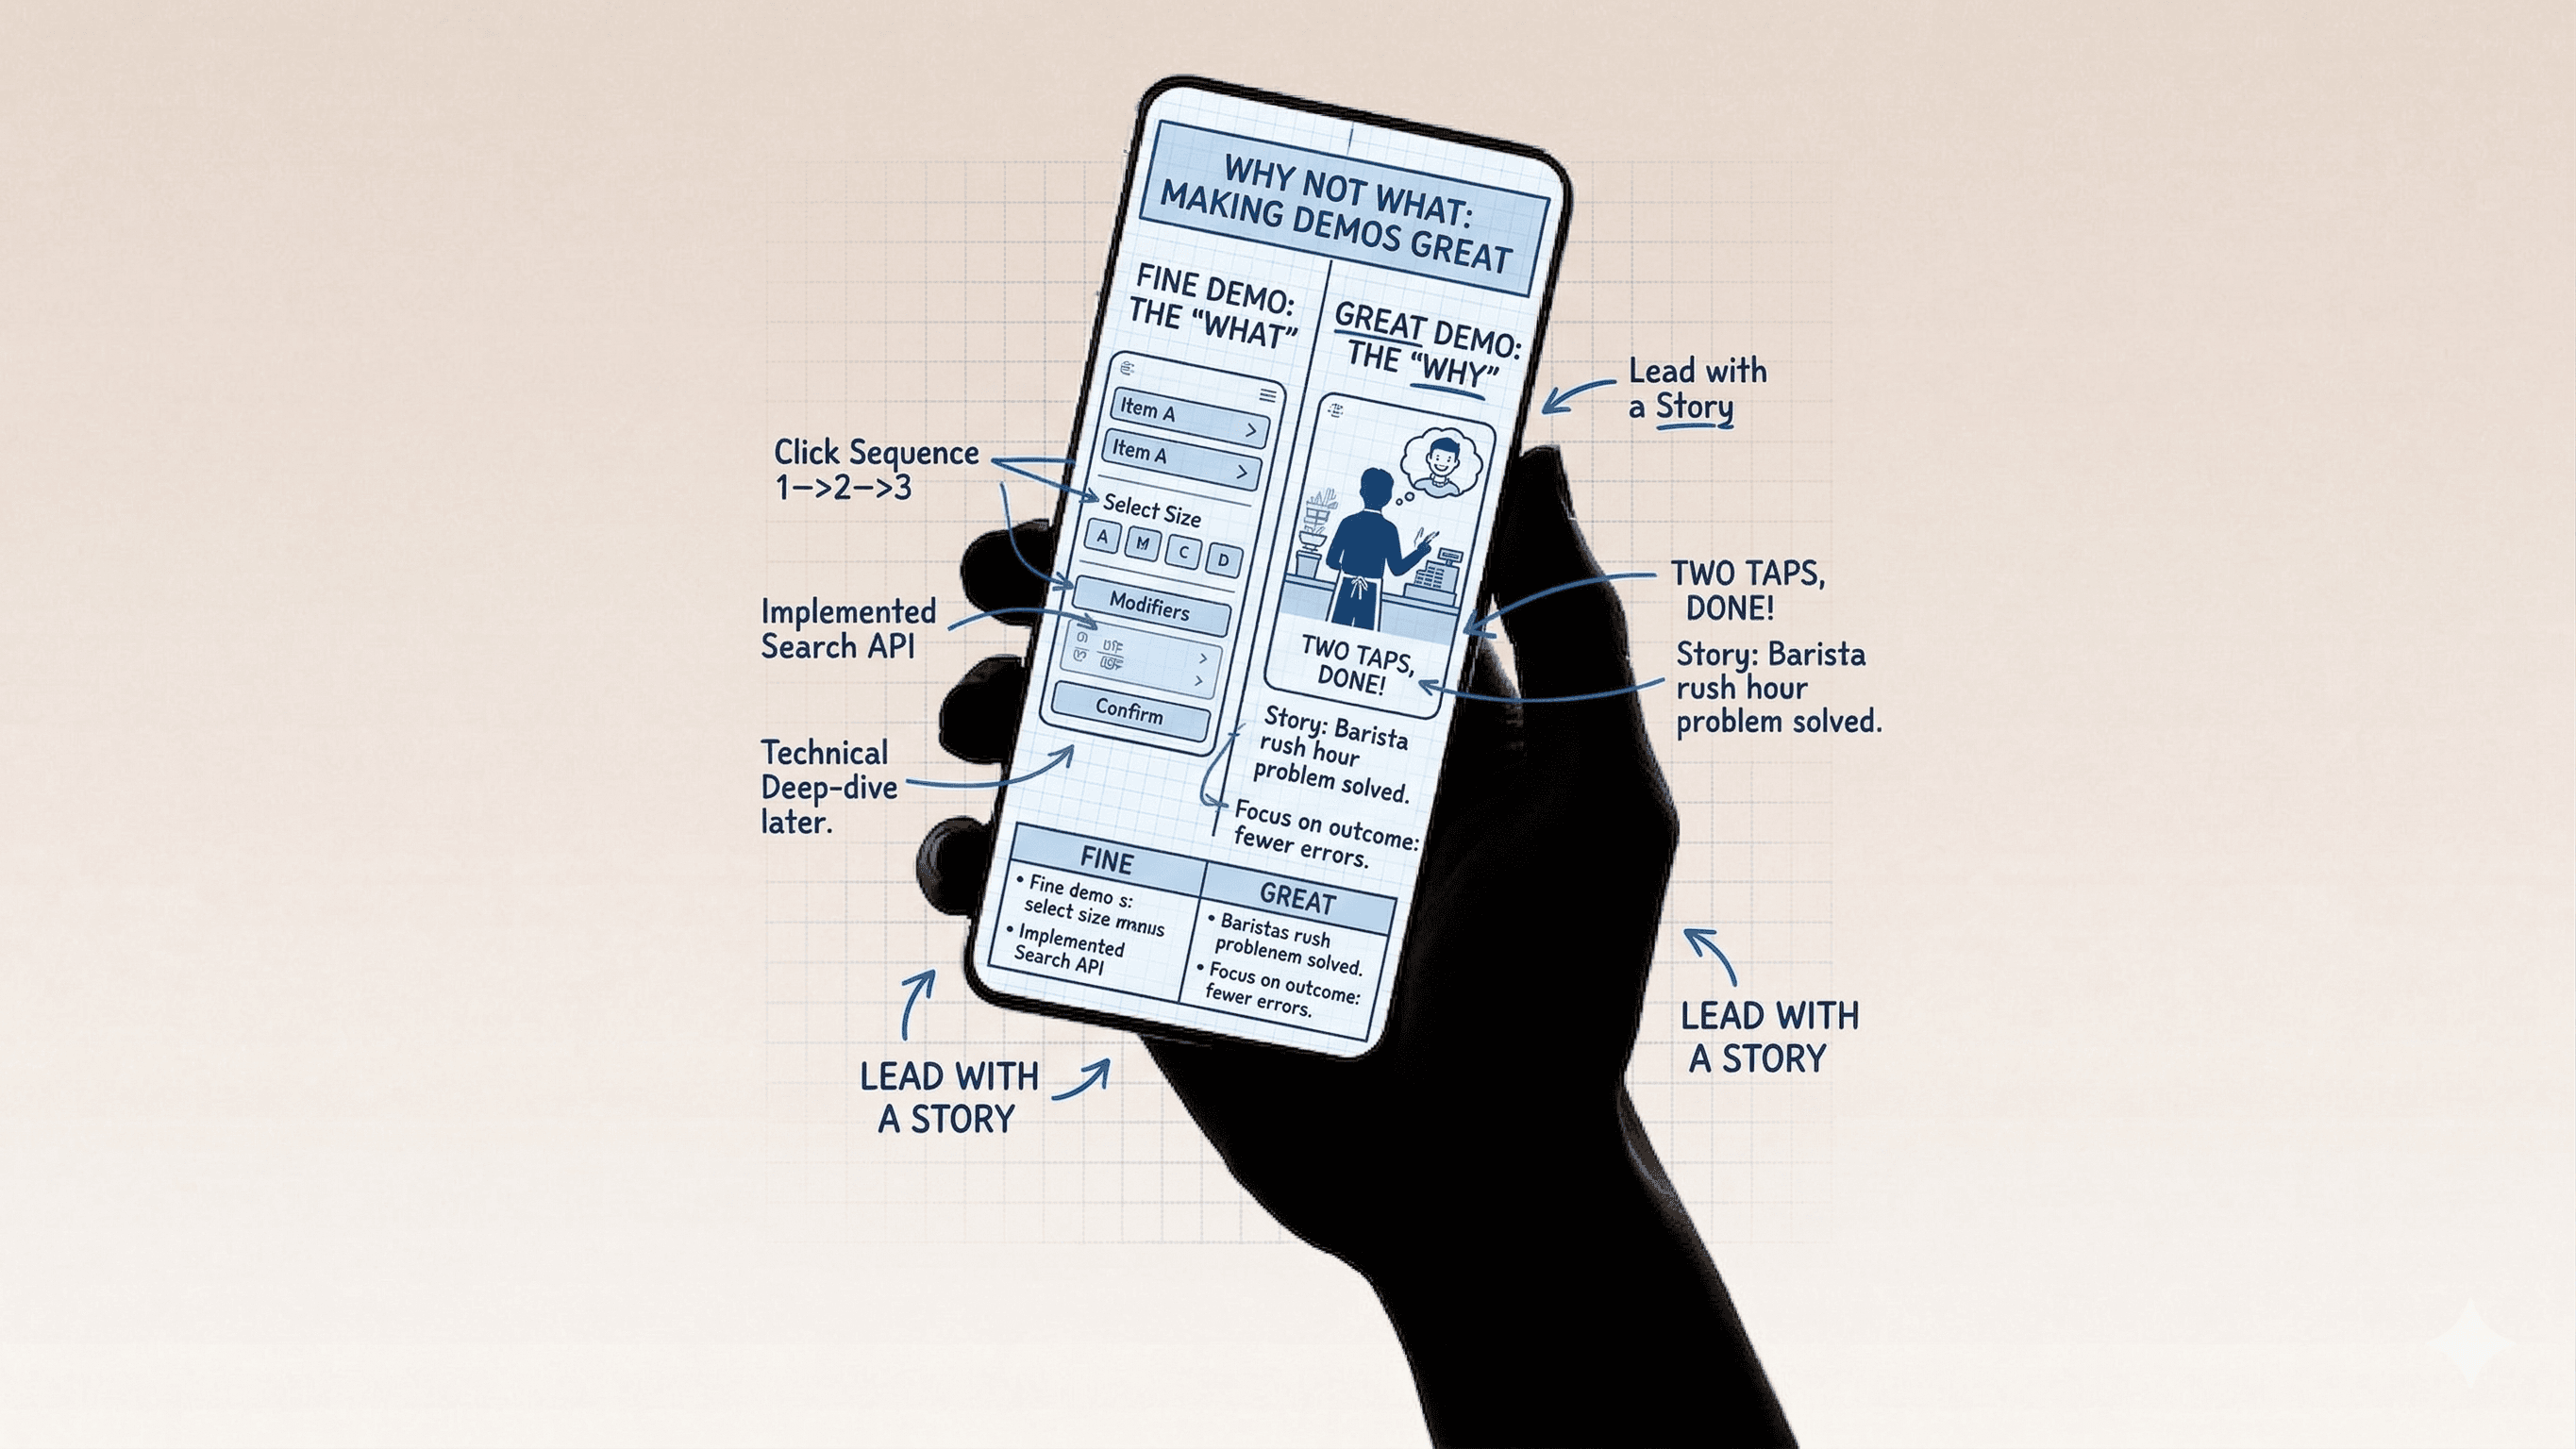
A Recipe for Great Engineering Demos
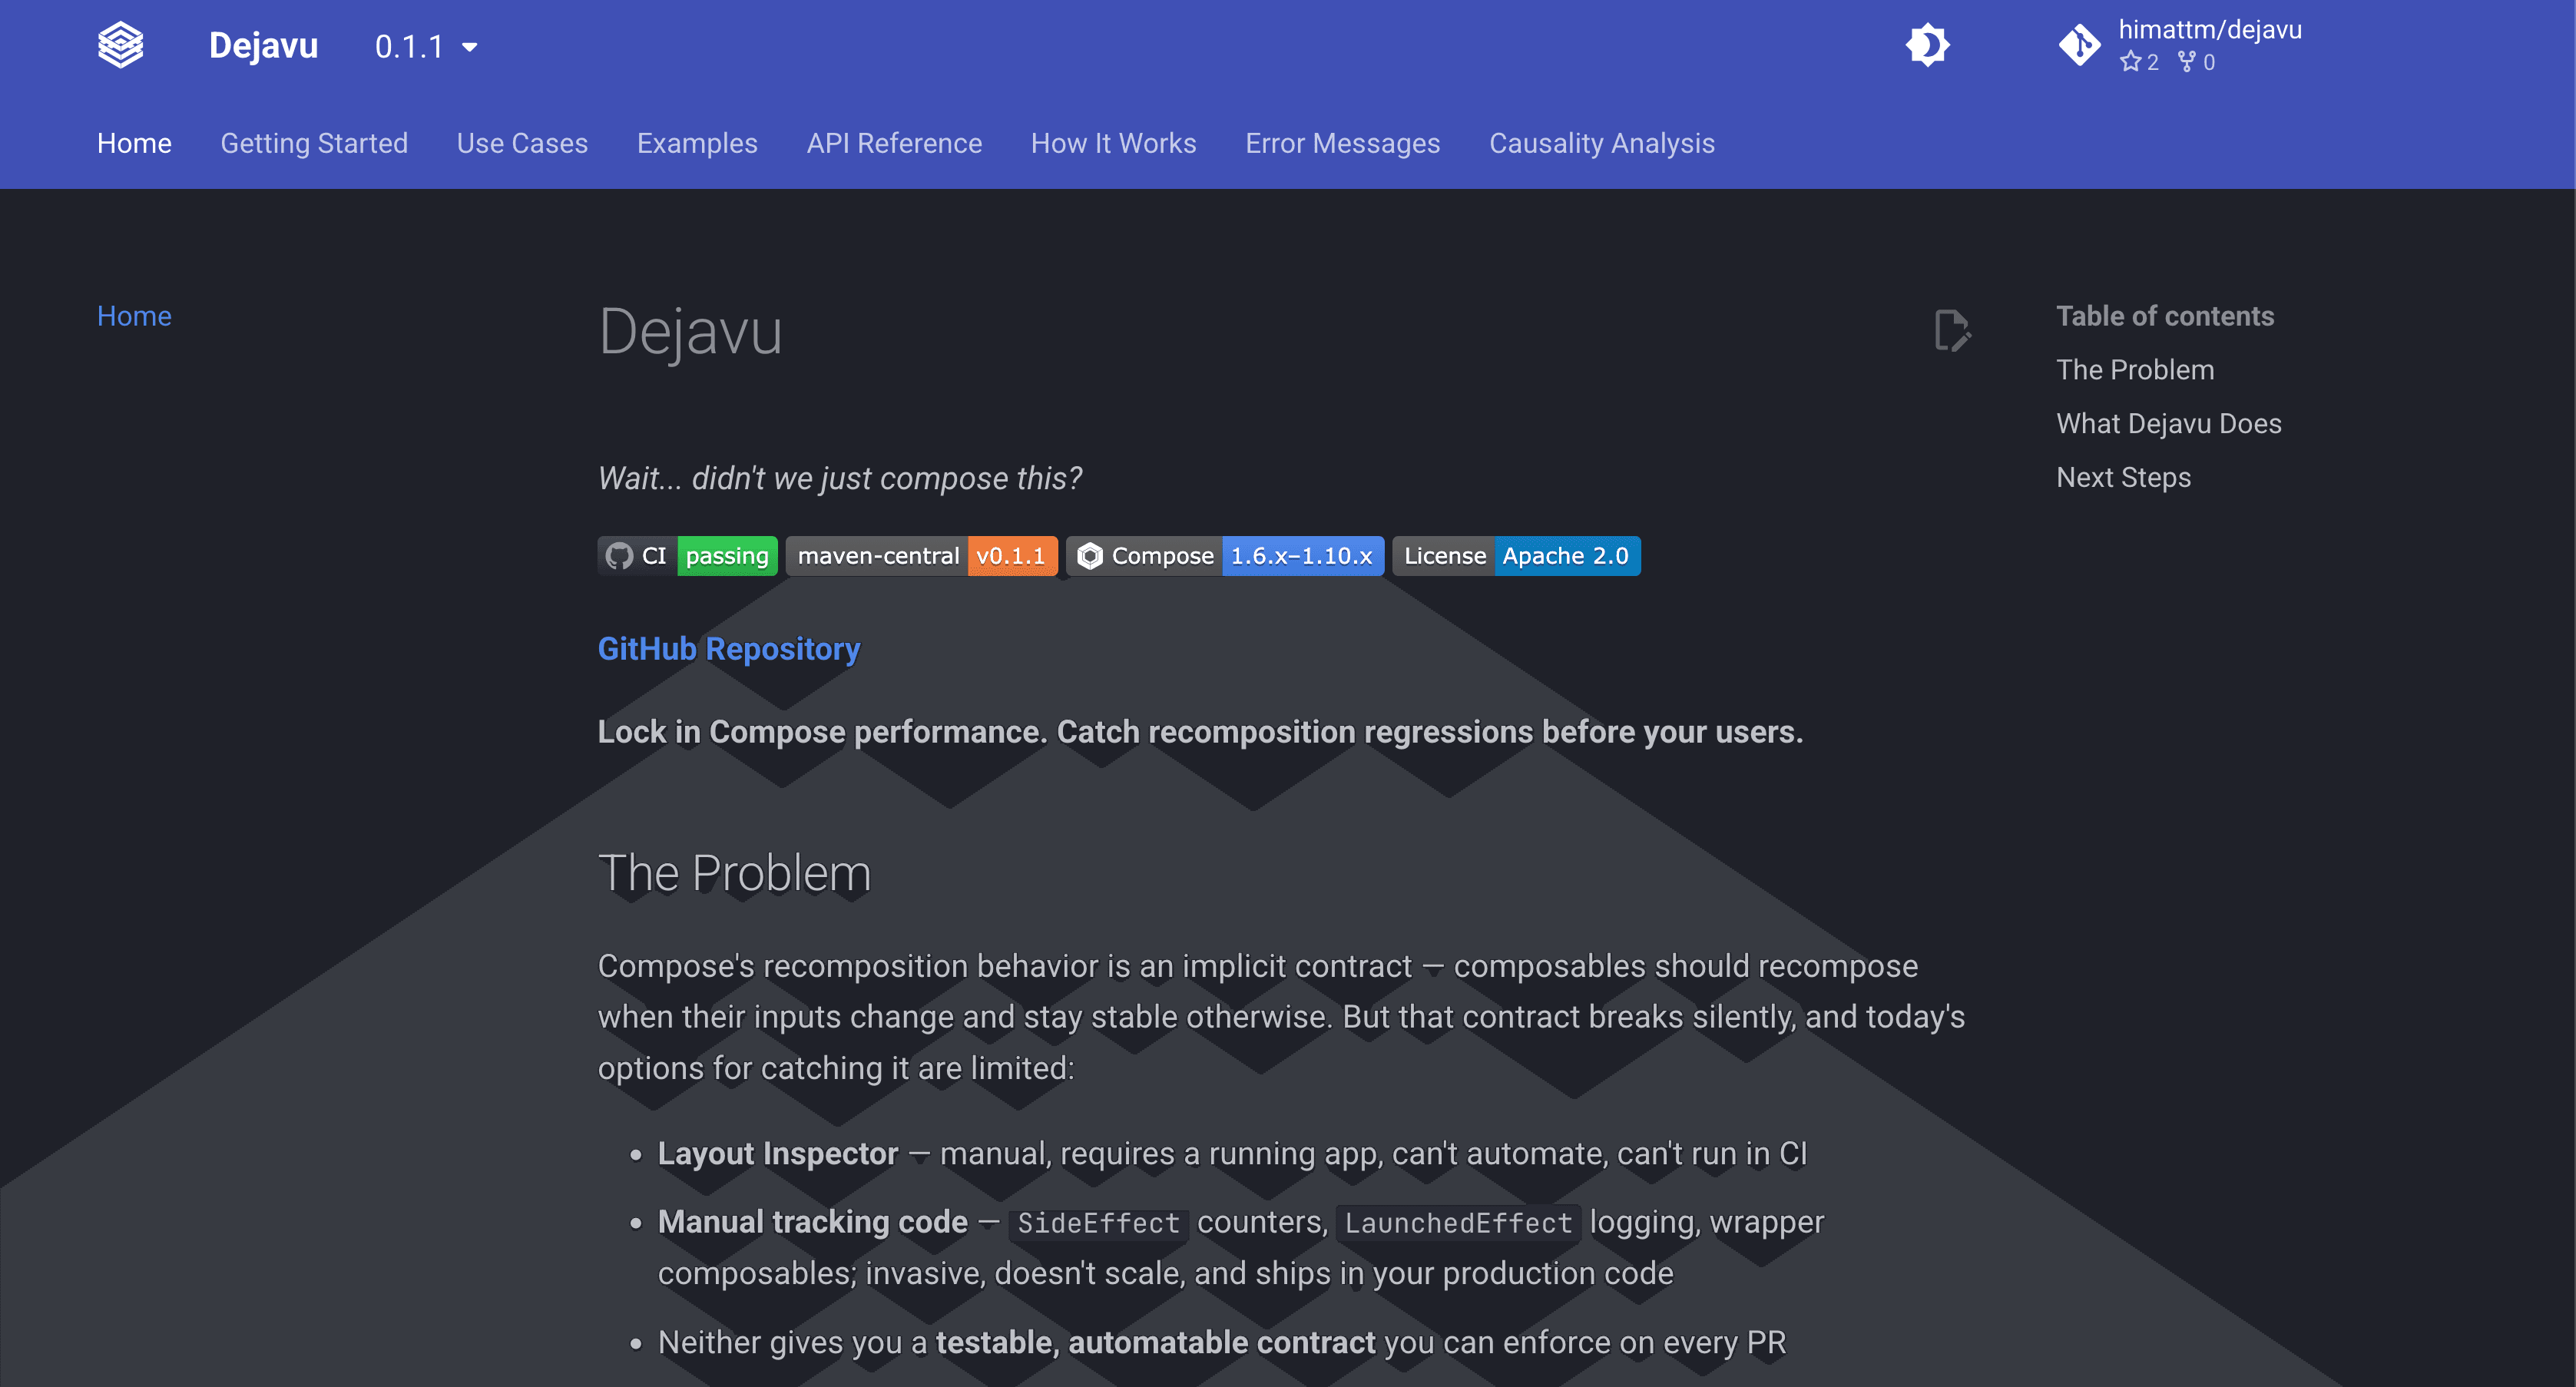
Wait... didn't we just compose this?
Ask anyone who worked at Block/Square what they loved most and I guarantee you the first thing they'll say is "its the people". Square's mission of economic empowerment and growing by helping others g
What are Live Templates?
How can they speed up your development?
And how to create your own for Jetpack Compose!
If you are like me you like to optimize some of the most common situations in your day to day tasks. Finding little ways to make your machine work more for you is satisfying and when it all adds up can lead to some serious time saved!
Android Studio's live templates are a great and fun way to increase your productivity.
One way to think about live templates are like acronyms. Much like in english "IDK" expands to "I don't know" a live template can expand from main to:
fun main(args: Array<String>) {
  $END$
}
Let's dive in!
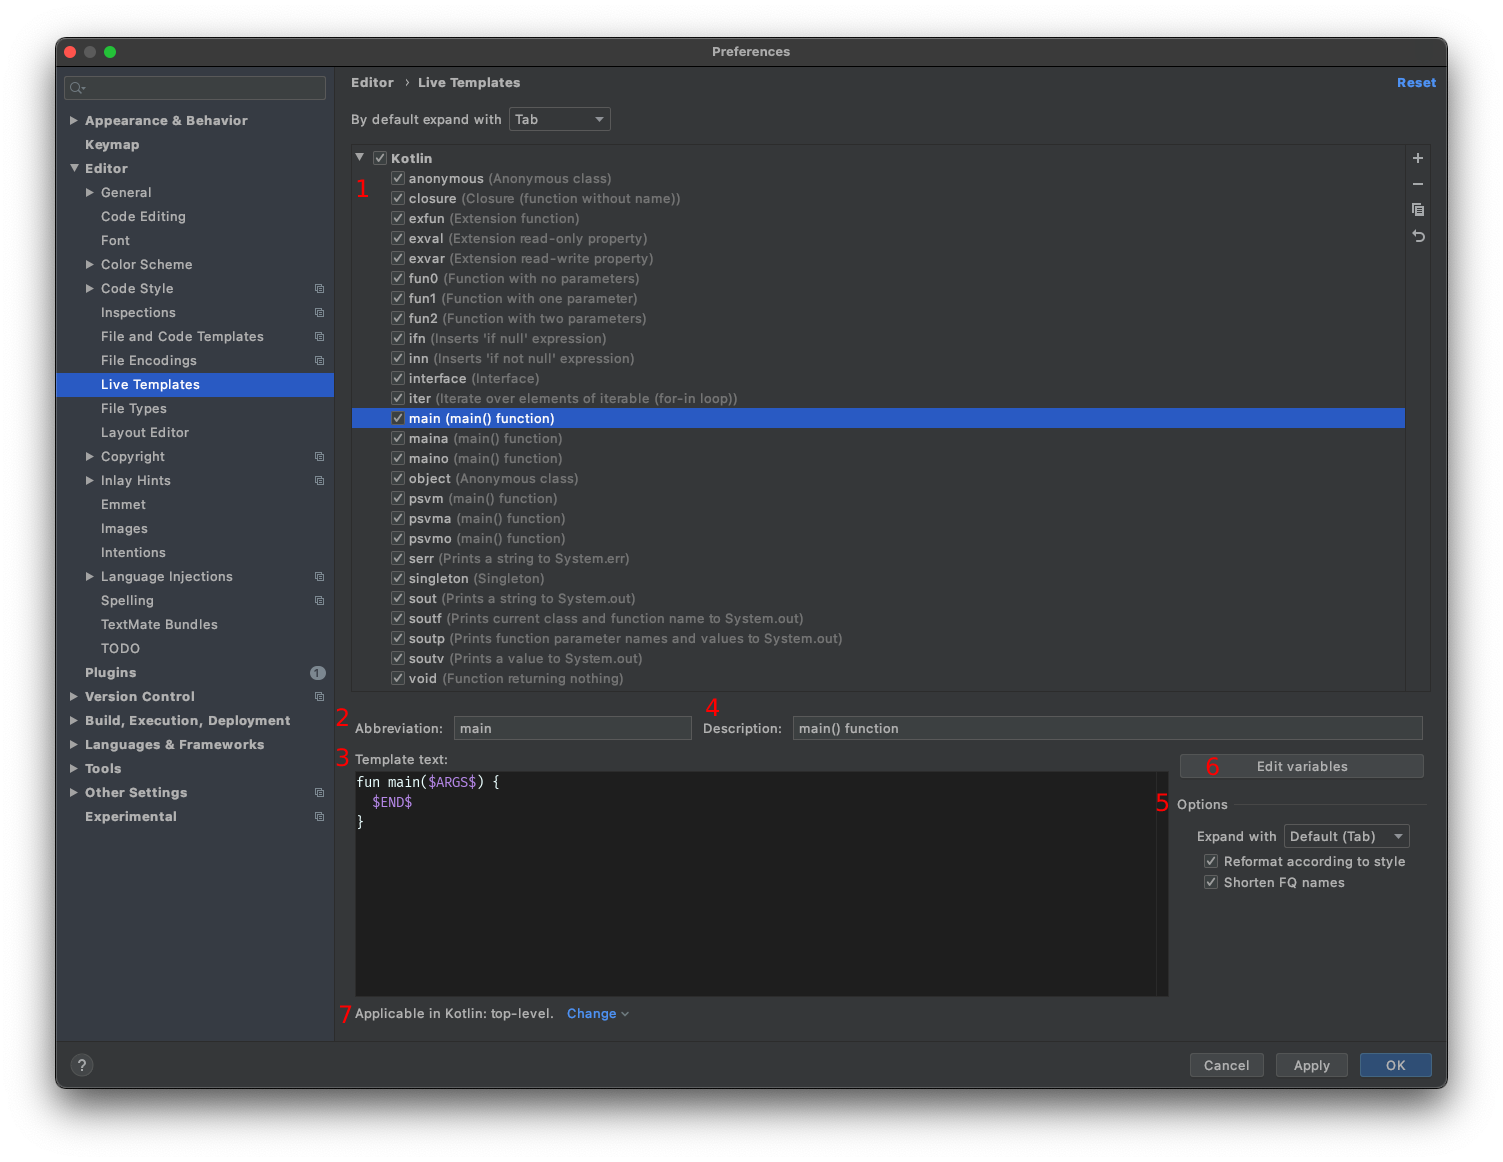
Android Studio comes with a bunch of live templates out of the box. These can be accessed by going to: Preferences > Editor > Live Templates. Lets see what kind of options we have in this settings screen.
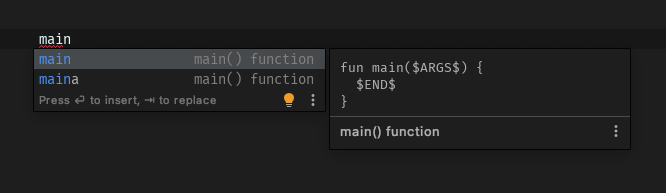
To use one of these live templates lets make a new kotlin file, type main, and then wait a second. A tool-tip window will show up enabling the insertion of a live template! Press enter or tab to insert.
And that's it! You have now used a Live Template.
Explore some of the example live templates for Kotlin and Android in the settings window to see what else is predefined. In the next section we will learn how to customize one of the preexisting templates to be a bit more useful.
Let's start by creating a simple live template for a custom TODO comment. I usually put my initials in my TODO's so that I can easily search them. They look like this:
// TODO:mcm
To start making this live template follow these steps:
Preferences > Editor > Live Templates+ button in the upper right corner.TODO.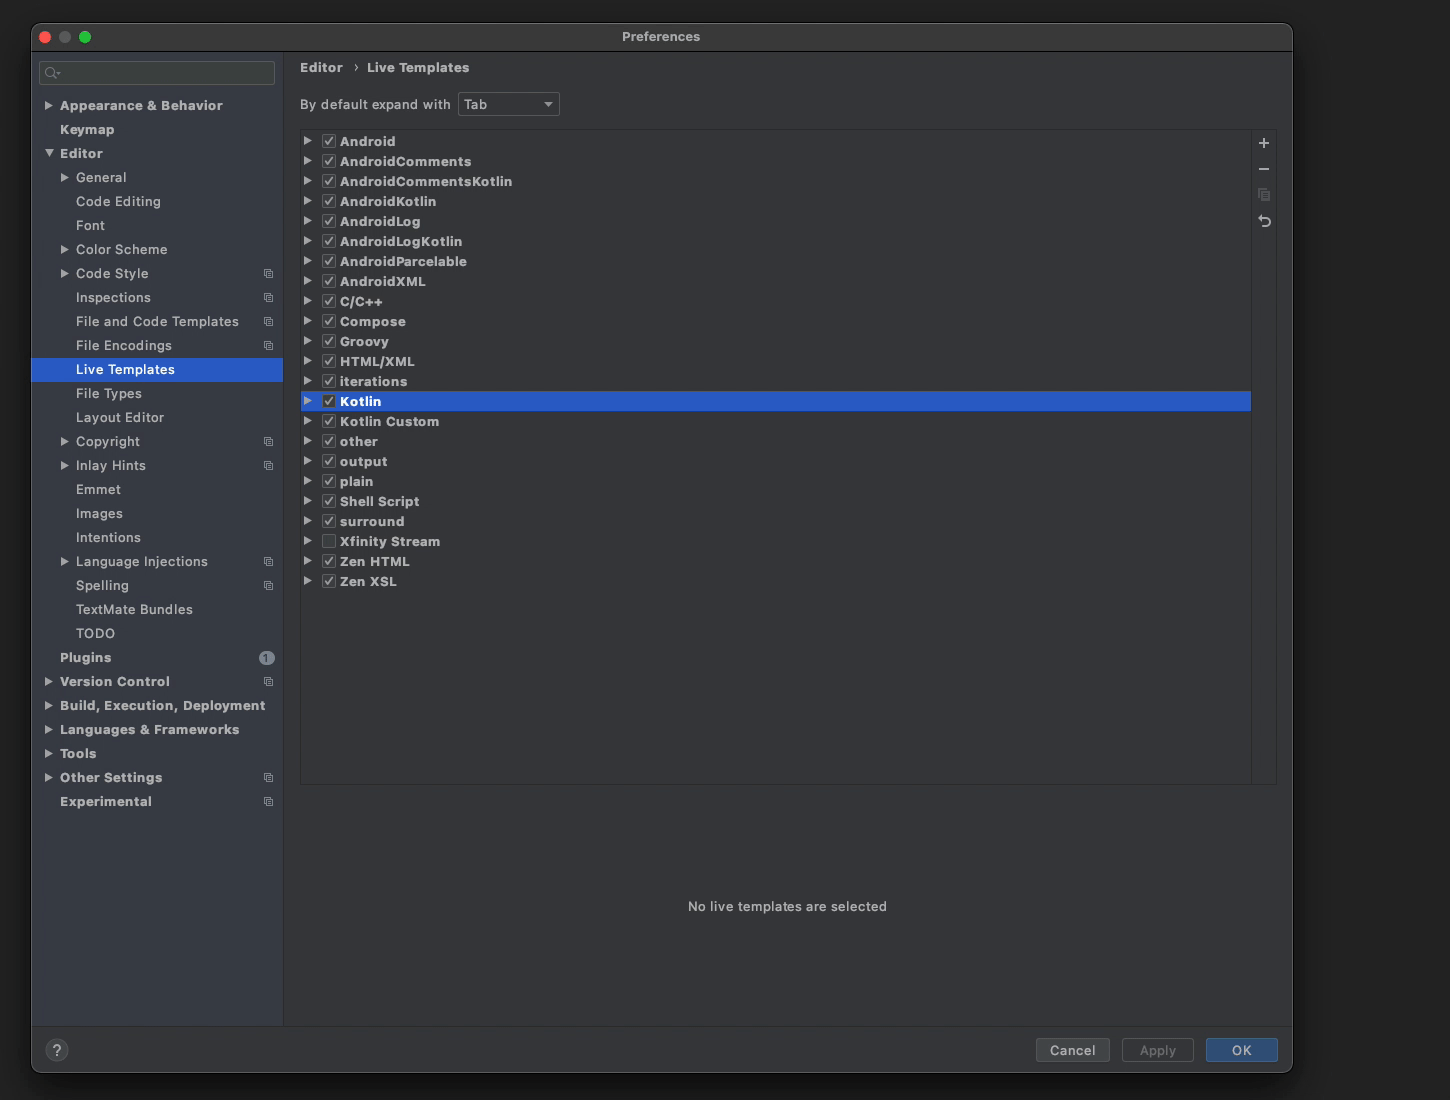
And that's it! Here it is in action!

To define a variable in a live template simply surround a string with dollar signs. Let's look at the provided Kotlin interface live template:
interface $NAME$ {
  $END$
}
$NAME$$END$After invoking the live template with tab the editor places your cursor to define a name for the interface. After entering a value for $NAME$ pressing tab again will take you to the next variable, until you get to the variable $END$. $END$, and a few other variables, are predefined for specific use.
$DOLLAR$$END$$SELECTION$The $DOLLAR$ variable is used for inserting a dollar sign ($) into a live template. Think of it like an escape sequence in a String. It will most likely be used in those sorts of situations. To see an example look at the Kotlin live template, soutv (Prints a value to System.out).
println("$EXPR_COPY$ = $DOLLAR${$EXPR$}")
$END$ is a special live template variable that just signifies the template is done being populated. When pressing tab leads to this variable your cursor will be placed in the $END$'s position and the live template will no longer be active.
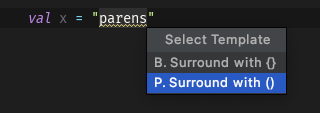
$SELECTION$ is a special variable type as it represents text that is highlighted in the editor. For instance to surround a piece of code with parenthesis we could define a live template like this:
($SELECTION$)
This live template is already defined as P under the Live Templates > surround section, along with a few others.
To trigger a selection live template, select the text you wish to use and then, if you are on mac, press ⌥+⌘+J (Ctrl+Alt+J for windows/linux) to prompt the dialog. Then the applicable live templates will appear! Now you can type the name or select which one to use.
Alright, this is where we get to the true magic of live templates.
In the first section we called out the edit variable button in the live template window. This is where variables gain extra power.
Lets jump to Live Templates > Kotlin > iter and see how it is defined:
for ($VAR$ in $ITERABLE$) {
  $END$
}
To break this down, we have the structure for a Kotlin for loop. Two variables are defined, $VAR$ for the variable name and $ITERABLE$ for the iterable collection. And finally $END$ to place the cursor in the for loop when the live template finishes executing.
Up until now this is exactly how we would define such a structure, but lets super charge it.
Click on the "Edit Variables" button that we saw above in location 6 to bring up this window table containing each of the defined variables.
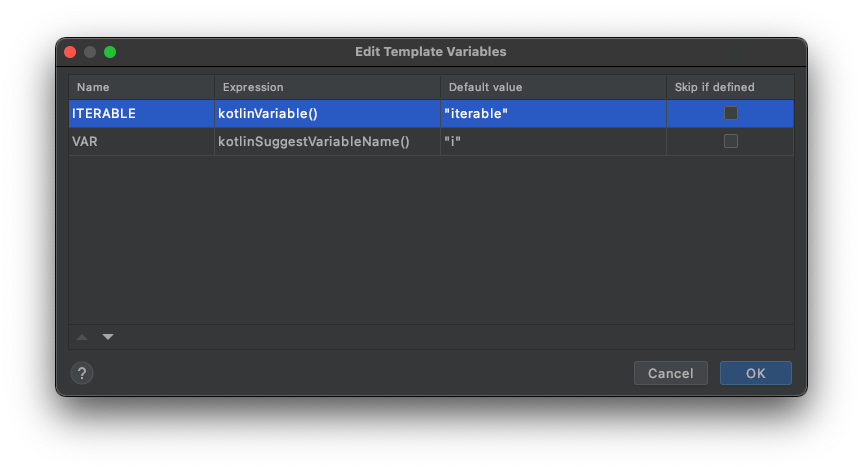
The Expression column has a drop down menu that provides access to many functions that can make the live template variables smarter. Let's take a look at the two variables in this tempate.
For the variable ITERABLE we see that there is an expression of kotlinVariable(). This function will make a suggestion for something that can populate this variable. If nothing is found then a Default value can be provided as a suggestion.
For VAR we see it has kotlinSuggestVariableName(). This function is tells the live template to put something like i, s, etc if a type can be inferred or loops are being nested. Here the Default value to suggest is i.
The last column in this table is "Skip if defined". Checking this box means that if the function executes and returns a value then this variable is considered defined and the live template will automatically move your the cursor to the next variable.
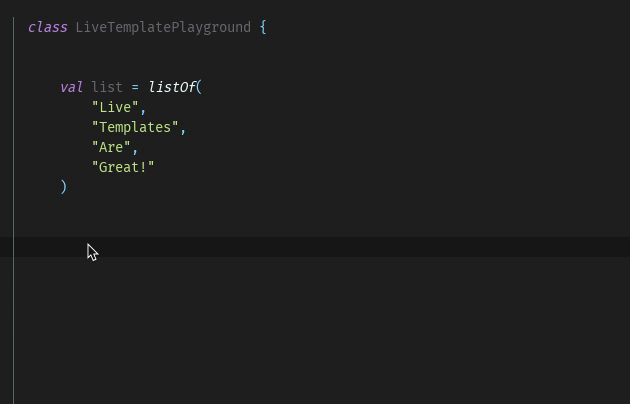
Lets see these functions in action! I will make a function to print out elements of a List<String>. Since Android Studio knows the list is only of type string it will suggest a variable name of s for VAR. And since we have a variable of type Iterable in our scope the variable ITERABLE will populate with the available val list! Finally, since the check boxes for "Skip if defined" are not enabled, the cursor still goes to each of these variable in case they need to be edited.
There are LOTS of these functions available for live template variables. The function names are pretty descriptive and I recommend looking through the drop down menus to see the options. There is a comprehensive list on the Jetbrains website.
There are a few options in the bottom right of the live template window which can add additional convenience.
tabTo automatically import with a live template the "Shorten FQ names" checkbox needs to be checked. Then include the fully qualified name in the live template definition.
Here is an example for making a quick test function and not needing to import the @Test annotation:
@org.junit.Test
fun $TEST_FUNCTION$() {
  $END$
}
Not all live templates should be accesible at all times. For instance, Kotlin live templates shouldn't be available in a Java context, but we can have even more control than that! Let's look at the live template to create a function with no return type (void).
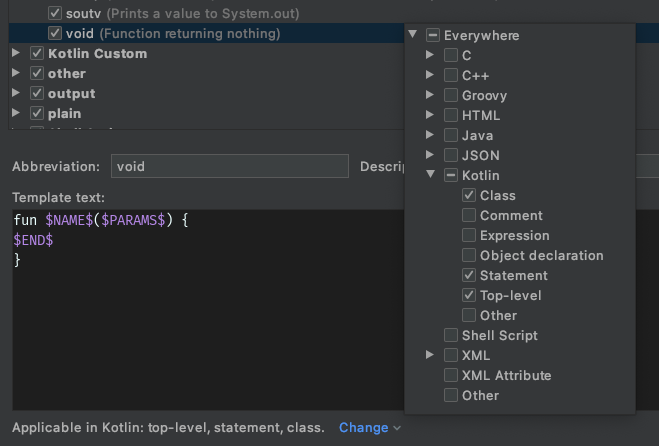
This live template is useful at the levels of:
but not at the other levels of:
This means is we can granularly configure when a live template could be applicable. Typing void while in a class will for the live template, but typing void in a comment will not!


Many of the code structures, syntax, and best practices in Jetpack Compose UI are very repeatable which means this is a great opportunity to create live templates! Android Studio Arctic Fox comes with some Compose live templates, but lets add some common uses that aren't included.
| Abbreviation | pcomp |
|---|---|
| Description | Create a private composable function |
| Shorten FQ Names | ✅ |
@androidx.compose.runtime.Composable
private fun $NAME$() {
  $END$
}
| Abbreviation | remstate |
|---|---|
| Description | Create a remember mutableStateOf Delegate |
| Shorten FQ Names | ✅ |
val $VAR$ by androidx.compose.runtime.remember {
  androidx.compose.runtime.mutableStateOf($END$)
}
| Abbreviation | spacer |
|---|---|
| Description | Makes a spacer of set width |
| Shorten FQ Names | ✅ |
androidx.compose.foundation.layout.Spacer(Modifier.width($NUM$.dp))
$END$
| Abbreviation | lazycol |
|---|---|
| Description | Makes a LazyColumn Composable |
| Shorten FQ Names | ✅ |
| Name | MOD |
|---|---|
| Expression | variableOfType(androidx.compose.ui.Modifier) |
| Default | "androidx.compose.ui.Modifier" |
| Skip if defined | Unchecked |
| Name | LIST |
| Expression | kotlinVariable() |
| Default | |
| Skip if defined | Unchecked |
androidx.compose.foundation.lazy.LazyColumn(modifier = $MODIFIER$) {
  items(items = $LIST$) { item ->
    $END$
  }
)
This live template idea is from Adam McNeilly
| Abbreviation | dnprev |
|---|---|
| Description | Create a day/night @Preview composable function |
| Shorten FQ Names | ✅ |
@androidx.compose.ui.tooling.preview.Preview(
    name = "Night Mode",
    uiMode = android.content.res.Configuration.UI_MODE_NIGHT_YES,
)
@androidx.compose.ui.tooling.preview.Preview(
    name = "Day Mode",
    uiMode = android.content.res.Configuration.UI_MODE_NIGHT_NO,
)
@androidx.compose.runtime.Composable
private fun $NAME$Preview() {
    $NAME$($END$)
}
This series of @Preview annotation live templates is inspired by William Barbosa
| Abbreviation | prevphone |
|---|---|
| Description | Create an @Preview annotation for a phone in light/dark mode |
| Shorten FQ Names | ✅ |
@androidx.compose.ui.tooling.preview.Preview(
    name = "Phone Night Mode",
    uiMode = android.content.res.Configuration.UI_MODE_NIGHT_YES,
)
@androidx.compose.ui.tooling.preview.Preview(
    name = "Phone Day Mode",
    uiMode = android.content.res.Configuration.UI_MODE_NIGHT_NO,
)
This series of @Preview annotation live templates is inspired by William Barbosa
| Abbreviation | prevtablet |
|---|---|
| Description | Create an @Preview annotation for a tablet in light/dark mode |
| Shorten FQ Names | ✅ |
@androidx.compose.ui.tooling.preview.Preview(
    name = "Tablet Night Mode",
    uiMode = android.content.res.Configuration.UI_MODE_NIGHT_YES,
    heightDp = 1080,
    widthDp = 760,
)
@androidx.compose.ui.tooling.preview.Preview(
    name = "Tablet Day Mode",
    uiMode = android.content.res.Configuration.UI_MODE_NIGHT_NO,
    heightDp = 1080,
    widthDp = 760,
)
This series of @Preview annotation live templates is inspired by William Barbosa
| Abbreviation | prevdesktop |
|---|---|
| Description | Create an @Preview annotation for a desktop in light/dark mode |
| Shorten FQ Names | ✅ |
@androidx.compose.ui.tooling.preview.Preview(
    name = "Desktop Night Mode",
    uiMode = android.content.res.Configuration.UI_MODE_NIGHT_YES,
    heightDp = 760,
    widthDp = 1080,
)
@androidx.compose.ui.tooling.preview.Preview(
    name = "Desktop Day Mode",
    uiMode = android.content.res.Configuration.UI_MODE_NIGHT_NO,
    heightDp = 760,
    widthDp = 1080,
)
Go play with and create some live templates! They are really fun to make and use in day to day development. If you need help with them or want to share what you've made reach out on Twitter! I'd love to see them (and add to my collection 😉)!
Header Photo by Tim Arterbury on Unsplash and modified by me.
Special thanks to Adam McNeilly for reviewing and proof reading this article.